If you’re running a WordPress website on an Ubuntu server with Apache and hosted on DigitalOcean, you may encounter the dreaded 404 error when accessing pretty URLs. This can be frustrating, as it impacts both user experience and SEO.
In this article, we’ll explore some proven solutions to fix pretty URL 404 Errors in WordPress.
What Causes Pretty URL 404 Errors?
Before diving into the solutions, let’s understand what causes these 404 errors. Typically, they occur when your .htaccess file is misconfigured, or when Apache’s mod_rewrite is either not enabled or not properly configured.
Preliminary Checks
Before proceeding with the fixes, make sure to:
- Backup Your Website: Always create a backup of your website before making any changes.
- Check
.htaccessFile: Ensure that your.htaccessfile is present in the root directory of your WordPress installation and that it is writable.
Let’s deep-dive into the solutions for fixing pretty URL 404 Errors in WordPress
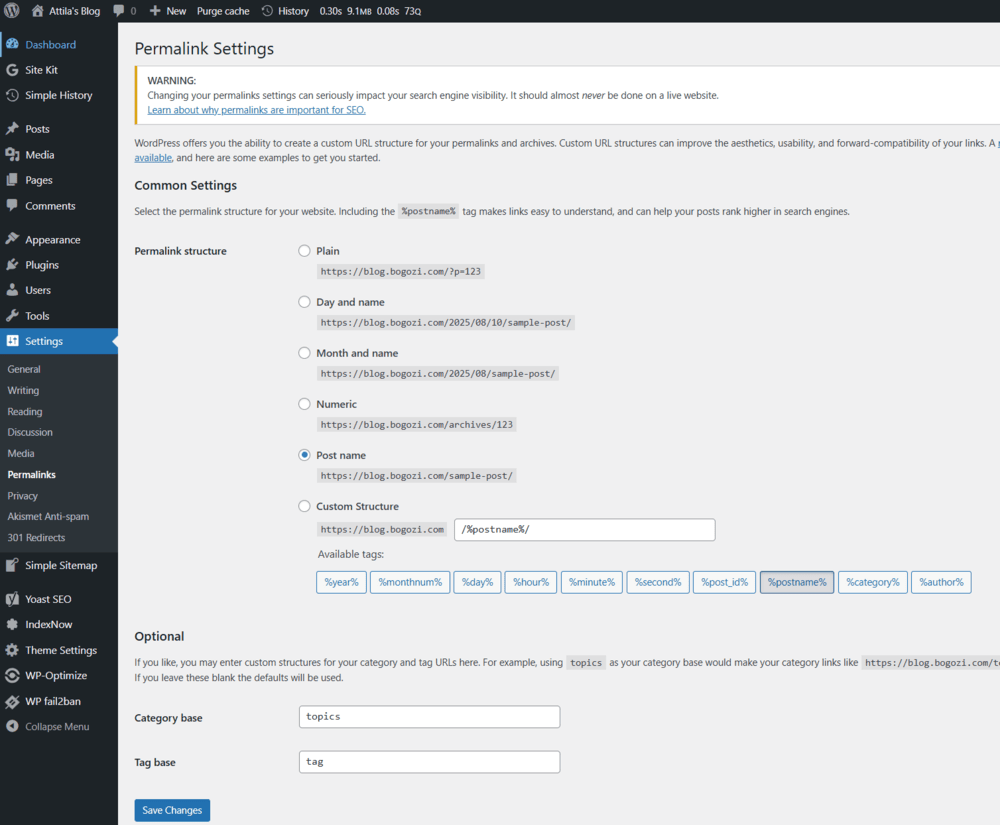
Method 1: Update Permalinks
- Log in to your WordPress Dashboard.
- Navigate to Settings > Permalinks.
- Simply click on the Save Changes button.
This refreshes the permalink settings and flushes the rewrite rules, which often solves the 404 issue.
Method 2: Manually Edit .htaccess
If the first method doesn’t work, you can manually update your .htaccess file. Open the file and insert the following code:
WordPress Version 6.3.1 looks like this:
# BEGIN WordPress
<IfModule mod_rewrite.c>
RewriteEngine On
RewriteRule .* - [E=HTTP_AUTHORIZATION:%{HTTP:Authorization}]
RewriteBase /
RewriteRule ^index\.php$ - [L]
RewriteCond %{REQUEST_FILENAME} !-f
RewriteCond %{REQUEST_FILENAME} !-d
RewriteRule . /index.php [L]
</IfModule>
# END WordPress
Method 3: Enable mod_rewrite Module
SSH into your DigitalOcean Ubuntu server and run the following commands:
sudo a2enmod rewritesudo systemctl restart apache2This enables the mod_rewrite module and restarts the Apache server.
Method 4: Update Apache Configuration
Check Active Configuration:
First, check the currently active Apache configuration for your-website.com by running the following command:
sudo apache2ctl -SThis command will display a list of all virtual hosts and their associated configuration files. Look for the ‘yourwebsite.com’ virtual host entry to confirm the configuration file that Apache is using.
If you have enabled HTTPS then you should see two different config files, like this:
VirtualHost configuration:
*:443 your-website.com (/etc/apache2/sites-enabled/your-website.com-le-ssl.conf:2)
*:80 your-website.com (/etc/apache2/sites-enabled/your-website.com.conf:1)
ServerRoot: "/etc/apache2"
Main DocumentRoot: "/var/www/html"
Check Symlinks:
Apache often uses symbolic links from the sites-enabled directory to enable or disable virtual hosts. Check if there is a symbolic link for ‘your-website.com‘ in the sites-enabled directory:
ls -l /etc/apache2/sites-enabledThis command will list the symbolic links in the sites-enabled directory. Ensure that there is a link pointing to the correct configuration file in sites-available.
First, open your default Apache site configuration file. This file is usually located at /etc/apache2/sites-available/000-default.conf. Keep in mind that this is the default configuration file. If you’ve already configured a specific website, you should navigate to that website’s configuration file instead, located at:/etc/apache2/sites-available/your-website.com1.conf or it’s https version located at: /etc/apache2/sites-enabled/your-website.com-le-ssl.conf
I need to also mention that in some cases, you might want to delete the 000-default.conf configuration file if it’s not in use, to avoid any conflicts.
Moving on. Inside the configuration file, locate the <VirtualHost *:80> block and add the following code:
<Directory /var/www/your-website.com>
        AllowOverride All
</Directory>
It is also possible that on the above line your website root folder is html. In this case you will need to use:
<Directory /var/www/html>
        AllowOverride All
</Directory>
After you’ve made the changes, save the file and restart Apache with the following command:
sudo systemctl restart apache2By following these steps, you should be able to resolve pretty URL 404 errors for your WordPress install.
If you still see the error 404 on your page, don’t give up!-We are going deeper.
Testing apache modules
First, make sure that the mod_rewrite module is enabled. You can check this by running the following command:
sudo apachectl -M | grep rewriteIf the mod_rewrite module is not enabled, you can enable it by running the following command:
sudo a2enmod rewriteNext, make sure that the rewrite rules are being loaded. You can check this by running the following command:
sudo apachectl -tFinally, make sure again that the WordPress permalinks are set to “Pretty permalinks”. You can do this by going to Settings > Permalinks in the WordPress admin dashboard.
After checking the rewrite rules, you might encounter this error in your console:
Error: AH00558: apache2: Could not reliably determine the server’s fully qualified domain name, using 127.0.1.1. Set the ‘ServerName’ directive globally to suppress this message
Don’t panic, to fix this, find the global Apache configuration file in the following location and open the file:
sudo nano /etc/apache2/apache2.confOpen the global Apache configuration file and add the following line to the very top of the file:
ServerName localhostSave the Apache configuration file and restart Apache.
sudo systemctl restart apache2Go back to the WordPress Settings and change your permalinks again, the save it again.
Going even deeper!
If you are still facing issues, I would recommend setting the AllowOverride to All in the global Apache configuration file just to see if the changes are reflected at all. If they are, the 404 error should be solved, if they are not then you might have a server error, or an apache2 configuration conflict and I suggest you contact your web hosting support team.
To update the global apache2 configuration file and instead of /etc/apache2/sites-available/000-default.conf or your custom configuration file /etc/apache2/sites-available/your-website.com1.conf you will update the global one located here: /etc/apache2/apache2.conf.
It should look something like this:
<Directory /var/www/>
	Options Indexes FollowSymLinks
	AllowOverride All
	Require all granted
</Directory>
As you’ll notice here, by default the global configuration is set to AllowOverride None, you overwrite that to AllowOverride All.
Restart apache again and update the permalinks settings in wp-admin again.
Conclusion
Let’s be honest—fixing pretty URL 404 errors in WordPress on an Ubuntu server with Apache on DigitalOcean can be very easy and also can be a difficult and frustrating journey. Last time I’ve installed a fresh WordPress on a DigitalOcean droplet, I have spent at least 6 hours with troubleshooting this issue before discovering that the solution for me was setting AllowOverride All in the global Apache configuration file. While this setting can be a lifesaver, I don’t recommend leaving it on for an extended period due to potential security risks. However, it could serve as a diagnostic tool to help you find your own answer.
So, if you’ve reached this point, I hope I’ve saved you some time and aggravation. Remember to always backup your website before making any changes. By employing these methods, you may find the solution that corrects your 404 errors, thus enhancing both your website’s usability and SEO.
If you’re still experiencing problems, don’t hesitate to consult with experts or delve into the WordPress community for more specialized troubleshooting. Your feedback is invaluable, so please share which methods worked for you and which didn’t, or feel free to discuss other possibilities in the comment section below. Good luck!
- replace “your-webiste.com” with your actual websites’ domain. No quotation marks are needed ↩︎
- replace “your-webiste.com” with your actual websites’ domain. No quotation marks are needed ↩︎
Here are some tools to consider using for this task
.htaccess tester tool: https://htaccess.madewithlove.com/
check out some other essential tools for web developers